Presently I have 15 cookbooks on my shelves that include a sourdough bread recipe, not to mention the countless excellent websites, blogs and Instagram bakers available to provide immeasurable instruction, resource, and inspiration. But no matter the source, sourdough bread-making is pretty much the same. You take the three most basic ingredients we have: flour, water, and salt - and you mix, stretch, wait, shape, and bake. And poof! Like magic, you have bread. I'm over-simplifying of course - excellent bread-making is equal parts skill and art. It takes time, work, and dedication to get good at it. It also requires excellent ingredients. And with so few in the literal mix, guess which one matters most? Spoiler alert: It's the flour!
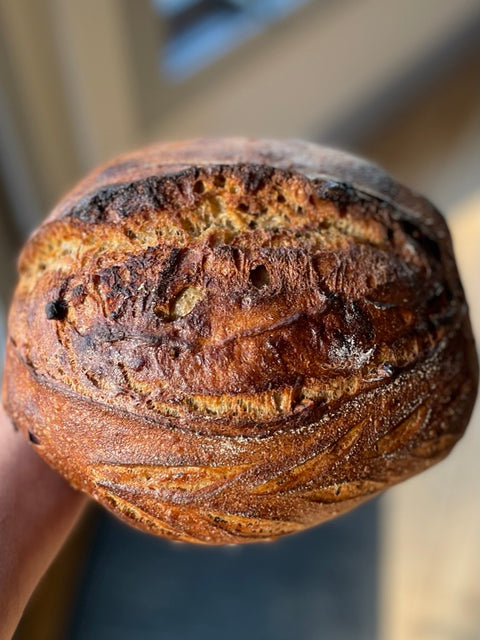
Below you'll find a suggested formula for a basic rustic loaf and/or an Ancient Grains loaf that I make regularly, as well as some tips I have picked up along the way in my bread-making journey. These work equally well with the newly launched Regenerative Organic versions of our Bread and AP flours (read more about that here) as they do with the conventional ones. The resulting loaf (loaves, actually – this recipe makes two) has a crisp, caramel-y crust, and a creamy, moist crumb. It stretches beautifully, retains shape at every stage, and rises up tall with plenty of oven-spring when baked.
If you don't already have a sourdough starter going, ask a friend who does for some (or message me!) and give it a go. Follow your favorite bakers, read up on technique, watch videos, and practice, practice, practice. And, use fresh, local flour! Because while turning three basic ingredients into a tantalizing loaf of bread is nothing short of magic, there is no illusion when it comes to the impact great flavorful flour will make on your loaves. - Deb, baker@groundup.com
A few things before we start:
· This process takes a while to complete - nearly 36 hours from start to finish.
· You need a digital scale.
· Proofing baskets, aka bannetons, are very helpful - though you could use colanders lined with a tea towel instead. You can even use a bowl, but something that breathes a little is better.
· You will need a large Dutch oven-style pot with a lid, or some other bread-making pan like The Challenger, or a bread cloche to bake your bread in.
· You need parchment paper.
Other things that are helpful but not essential:
· A metal bench scraper
· A digital food thermometer
· A lame (like this), or a razor blade (a sharp knife works or even scissors work too)
YIELD: Makes two large loaves
INGREDIENTS:
-
700 g Ground Up Bread Flour (Regenerative Organic or Conventional)
-
300 g Ground Up All Purpose Flour (Regenerative Organic or Conventional)
(or for an Ancient Grains loaf: 500 g Ground Up Ancient Grains Bread Flour and 500 g Ground Up Bread Flour (Regenerative Organic or Conventional)
-
800 g water (divided)
-
200 g levain
-
20 g sea salt
INSTRUCTIONS:
Step One: Prepare Your Levain
The night before you want to mix your dough, or however long it takes for your starter to refresh, build a 100% hydration levain using 20g starter, 100g flour and 100g water. (I use 70% GU AP and 30% GU Whole Wheat to feed my starter). When I do this at night, I wake to a risen, bubbling starter, ready to go to work for me in the morning.
Step Two: Measure, Mix and Hydrate your dough (aka The Autolyze)
Combine Bread and AP flours, or Ancient Grains and Bread flours into a large bowl and mix to combine. To that, add 750g warm water. Temperature matters here. Your levain should be room temp (around 70°) and your water around 80°. If your kitchen is hot and humid, use cooler water, and if it’s cold, use warmer water. Mix the flour and the water to combine. This step is messy but do the best you can to combine everything until no dry flour remains. Then, use a bench scraper to scrape the flour off your hands and back into the shaggy dough. Cover the dough bowl with plastic wrap and let rest for 20 minutes.
Note: Many recipes say to cover the dough bowl with a towel. In my experience, you really want to keep the heat and moisture in the bowl at this stage (and all stages until the end). Nothing works as well as plastic wrap for this. I re-use plastic wrap repeatedly - even if it has lost its cling. I press it over the bowl covering the edges and leave no space for air. Then I tightly cover that with a large kitchen towel to keep the plastic in place. You can also use a plastic shower cap.
Note: Find a warm, draft-free place for your dough to rest throughout this entire process. If you have a digital thermometer, poke it into your dough to take a reading. You’re aiming for 78° so you can get an idea of whether your dough needs to be in a very warm spot or a cool spot.
If your kitchen is cold, some ideas for the resting spot:
-
Inside your oven with the oven light on. (Oven is off, but light is on).
-
Some ovens have a proofing setting, which is about 85°F. This is ideal if your oven has it.
-
If your microwave is big enough, the inside of it, with the door closed, can work.
-
I often use a heating pad, especially in winter, on the lowest setting and place the bowl on top of it - though when you do this, you do need to make sure it doesn't get too warm.
Step Three: Add your levain
Uncover your dough and pour/spoon 200g of levain over the top of the dough. Beginning with the fingertips of your dominant hand, dimple the levain into the dough, and then continue to use your whole hand to further incorporate it so the levain and dough become homogenous. Cover again with plastic and let rest for 30 minutes.
Step Four: Add Salt (and a little more water)
Uncover your dough and sprinkle 20g fine sea salt over the top of it. On top of that, add an additional 25g water. (Save the remaining 25g water to dip your hands in throughout the later process of stretching and folding the dough.) Use your fingers to depress the salt into the flour. Imagine you are playing the piano to press the salt into the dough. You should feel the bottom of the bowl but be gentle and try not to poke a hole in the flour. You’re already starting to stretch those gluten strands – think about like elongating an elastic band: stretch but don’t tear. Once you've done that, begin to incorporate the salt completely in a more traditional kneading style. Squeeze and smoosh it in until you don't feel any grittiness from the salt. Pick the dough up and turn it over in your bowl so that the smooth side that was on the bottom is now on the top. Cover again and let rest for 30 minutes.
Note: I once read a description that likened salt being added to dough like a parent showing up at a teenager’s party. It calms things right down, and while the party can continue, it will not get out of control. Salt does the same. It allows your dough to continue to rise, but at a controlled pace (and of course, it adds flavor too).
Step Five A: Bulk Fermentation - Stretch and Fold
Now you will perform a series of four stretch and folds, 30 minutes apart, over the next two hours. I do this right in the bowl where my dough has been resting. Dip your fingers into the reserved water to prevent sticking, then pick up a piece of the dough from the edge and fold it over onto itself. Repeat this several times until you work your way all the way around the dough. The goal is to begin gently stretching and lengthening the entire dough ball (not just the edges). Again, think about those gluten strands getting longer and stronger. Stretch, but don’t tear. After each round of stretch and folds, return the dough to the bowl, again flipping it so the part that was on the bottom is now the top, and cover the bowl with plastic wrap. By the fourth round, the dough should be getting puffy, and should easily pull away from the sides of the bowl.
Note: Here is an excellent video demonstrating this technique here in this King Arthur post (you have to scroll down through the body of the story to get to the video).
Step Five B: Bulk Fermentation - Bench Rest
At this stage your dough should be a nice smooth, puffy blob. Leave it to rest, covered, in its warm place, for about two hours. I know, you hate me here, but this is where you just must practice and see how your dough is responding. There are many factors that contribute to how long you should allow your dough to rest at this stage, but two-to-three hours is usually sufficient. Take your doughs temperature after two hours – again you are aiming for around 78°. You can also perform the windowpane test, by pulling up a square of the dough and seeing if I can stretch it thinly, almost to where I can see through it, without tearing. If the dough tears, it needs more time.
Step Six: Pre-shape
Ok, we're almost there now. Lightly flour the top of the dough and flip it onto a counter or smooth surface. Using your bench scraper, divide the dough into two equal-ish pieces. Gently coax each piece into a ball - you can do this by picking up the ends, folding them into the middle, and flipping the dough ball over, or you can use your bench scraper to help you rotate the dough ball, tucking the ends under itself as you work the dough ball around on your counter top into a ball. Cover the pre-shaped doughballs with a kitchen towel and let them rest for 20 minutes. The dough balls should hold its shape at this point. If they spread too much one your counter, let them rest, covered, for another 20 minutes. (A little spreading is normal, but totally flattened blobs is not.)
Step Seven: Final Shape
First, prepare your bannetons by either lining them with a linen cloth or a kitchen towel (or these hairnets that I love), or if you don’t want to use a liner, dust them liberally with a mix of whole wheat and rice flour to prevent sticking.
Next, uncover one of your dough balls and gently separate it from its twin. Move it into a position that's comfortable for you to work with it, directly in front of you on your counter. Lightly flour the top of the dough and flip it over, so the floured side is now on the bottom, resting on the counter. Flour your hands but try not to incorporate any more flour into the dough at this point. Gently pat the dough into a rectangle (don’t worry too much about this shape, it’s just to make describing the next step easier). Grab the short, right side of the rectangle, stretch it out to the right to elongate it a few inches, and then fold that piece into the middle. Repeat the same thing on the left side. Then grab the side closest to you (at about the 6:00 on a clock) and begin to roll it up, incorporating the already folded ends, until a cylinder/tube forms. You can also create a circle if that’s easier, by grabbing, stretching, and folding the edges, working your way around the dough like a clock. (Ideally the shape you create should correspond with the shape of your banneton, but I don’t think there’s too much difference between in a circle and an oblong final shape, as long as you are create a tight skin).
Flip the dough over and, on un-floured counter space, cup your hands gently around the dough package and pull it towards you, allowing the bottom of the dough to catch and drag on the counter. This tension will create a tight top skin and a seam on the underside. This shaping allows the dough to hold its shape while baking and allows for proper oven spring. Once shaped, gently lift the dough from the counter and transfer to your prepared banneton, flipping it so the smooth side faces down in the basket and the seam side is up (opposite of how you worked it on the counter). Repeat this process shaping process with your second pre-shaped dough.
Note: There are a million videos out there illustrating this process. This is a good one!
Step Eight: Overnight Rest / Cold Ferment
Once your doughs are snuggled into their baskets, it’s time for bed. (For you too, probably). Cover each basket tightly with plastic wrap (again, you can re-use plastic wrap – I just use a large rubberband to secure plastic that’s lost its cling). Put the baskets in the refrigerator and allow them to rest for at least 8 hours. (A little more or a little less is ok – the longer the rest, the more pronounced the sour flavor will be).
Step Nine: Preparing to Bake and then finally, Baking Bread!
Note: Assuming you have a normal kitchen-sized oven (30” to 36”) and one Dutch-oven style baking vessel, you will probably have to bake your loaves one at a time. This is a little bit of a bummer, but the reward will be two gorgeous loaves of delicious bread, and your kitchen will smell heavenly for the entire day. That said, it’s not impossible to fit multiple Dutch ovens in at the same time (I’ve done this!) but this takes some effort.
Start by putting your Dutch oven, and its lid, in a cold oven. Turn your oven on, and preheat it to 475°F. This will take a while, especially if your Dutch oven is cold, but be patient. You want your oven AND your baking vessel to be fully heated before you bake.
If you are baking your loaves one at a time, remove one of your bannetons from the refrigerator. Tear two pieces of parchment paper, large enough to cover the top of your bread basket and with enough overhang to be able to lift and place your dough (like a sling) into your very hot Dutch oven when the time comes. Set one piece of parchment aside for your second loaf. Remove the plastic wrap from the loaf you are working with and center the parchment over the top of the basket. Quickly flip the basket over – so the dough is in your hand, on the parchment. Gently place it on place it on a work surface, and remove the basket, which is now on the top. (If you did not use a liner, proceed slowly, making sure there are no sticky spots).
You must score your dough to accommodate for its expansion during the bake. Using a lame, or just a hand-held razor blade (or a sharp knife or a pair of scissors), slash the loaf quickly and confidently down it’s center, or make a T-shape or a little box shape at the top of the dough.
To transfer to the baking vessel and bake, put on your best oven mits, and carefully remove your Dutch oven from the hot oven. It will be VERY hot. Uncover it, and, working quickly but carefully, place your scored loaf directly into the pot (along with the parchment paper it’s been resting on). Refit the lid, and quickly slide it into your hot oven. Bake, securely covered, for 20 minutes. After 20 minutes, carefully remove the lid to allow steam to escape. You must be extra careful here – steam can cause serious burns. As quickly as you can, return the uncovered pot to the oven, reduce the oven temp to 450°, and allow the loaf to bake for another 15-20 minutes, until your crust is golden-brown. Remove the pot from the oven, then remove the loaf and place it on a rack to cool. Return the Dutch oven, with its lid, to the oven and turn your heat back up to 475°. Allow the oven to fully return to temp. Then, repeat the entire process with your second loaf.
Step 10: Cool and Enjoy
Warm bread is delicious, but hot bread doesn’t slice well. Let your loaves cool significantly before cutting into them. This allows the internal moisture to further evaporate and the crumb to set. Once you can easily handle the loaves, they’re ready to enjoy.
Sourdough loaves will remain fresh for several days, especially unsliced. You can keep a cut loaf, cut side down, on a counter or cutting board or you can store in a bread box or paper bag. These loaves also freeze beautifully. Once completely cooled, wrap in plastic, or transfer to a Ziploc bag, or a reusable bread bag, like this, and then freeze for up to a month.